Materials
To make you will need
1. Acrylic yarn, for this pattern, I normally used 8 ply
2. Plastic eyes with safety backing 7.5mm (you can find it at any craft shop)
3. Polyester fiber fill for stuffing
4. Sewing needle and embroidery
5. Ribbon or button
7. Crochet hook size 1.25mm or the size that match your choice of yarn
8. Craft glue
Note
The size of the crochet hook really does not matter. The doll design will work just fine with different sizes of yarn with a matching hook, it will only affect the finished doll size.
In this pattern, you will be working in continuous round, you may use a short length of contrasting color yarn to mark the beginning of each round. When you finish a round, do not join at the end of each round, instead continue single crochet the next stitch to begin a new round and work spirally upward.
In the pattern, I have given the number of stitches you should have at the end of each round. If you are off by 1 or 2 stitches, do not worry about it.
Skill and abbreviations
You will need to know how to make a adjustable ring
-Single crochet (sc)
-Crochet increase (inc) means: make 2 single crochet in same stitch
-Crochet decrease (dec) means: Crochet 2 stitches together
-Stitch (st)
-Chain (ch)
-Slip stitch (slst)
-Round (Rnd)
-* : Repeat stitches from * to end of *
You will need to know how to make a adjustable ring
-Single crochet (sc)
-Crochet increase (inc) means: make 2 single crochet in same stitch
-Crochet decrease (dec) means: Crochet 2 stitches together
-Stitch (st)
-Chain (ch)
-Slip stitch (slst)
-Round (Rnd)
-* : Repeat stitches from * to end of *
 Head: make 1 piece with your choice of yarn color. Work from top to bottom.
Rnd1: Make magic ring and 6sc in ring (6)
Rnd2: 2sc in each st around (12)
Rnd3: *Sc in next st, 2sc in next st*, repeat * around (18)
Rnd4: *Sc in next 2 st, 2sc in next st*, repeat * around (24)
Rnd5: *Sc in next 3 st, 2sc in next st*, repeat * around (30)
Rnd6: *Sc in next 4 st, 2sc in next st*, repeat * around (36)
Rnd7-14: Sc in each st around (36)
Rnd15: *sc in each of next 4 st, dec 1*, repeat * around (30)
Rnd16: *sc in each of next 3 st, dec 1*, repeat * around (24)
Rnd17: *sc in each of next 2 st, dec 1*, repeat * around (18)
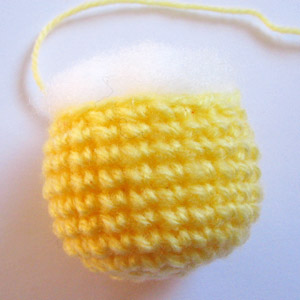
Rnd18: *sc in next st, dec 1*, repeat * around (12), finish off with a long tail for sewing.
Stuff polyester firmly.
 Body: make 1 piece with your choice of yarn color. Work from bottom to top.
Rnd1: Make magic ring and 6sc in ring (6)
Rnd2: 2sc in each st around (12)
Rnd3: *Sc in next st, 2sc in next st*, repeat * around (18)
Rnd4: *Sc in next 2 st, 2sc in next st*, repeat * around (24)
Rnd5-10: Sc in each st around (24)
Rnd11: *sc in each of next 2 st, dec 1*, repeat * around (18)
Finish off with a long tail for sewing. Stuff polyester firmly.
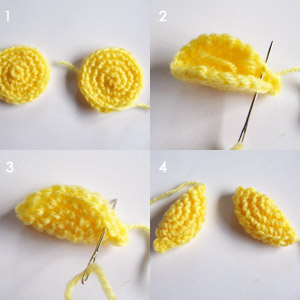
 Wings: make 2 pieces with your choice of yarn color.
Rnd1: Make magic ring and 6sc in ring (6)
Rnd2: 2sc in each st around (12)
Rnd3: *Sc in next st, 2sc in next st*, repeat * around (18)
Rnd4: Sc in each st around (18)
Finish off with a long tail for sewing (as shown in the photos).
 Mouth: make 1 piece with your choice of yarn color.
Rnd1: Make magic ring, 8sc in ring (8) and join with slst.
Finish off with a long tail for sewing.
 Legs: make 2 pieces with your choice of yarn color.
Rnd1: Make magic ring, 10sc in ring (10) and join with slst.
Finish off with a long tail for sewing.
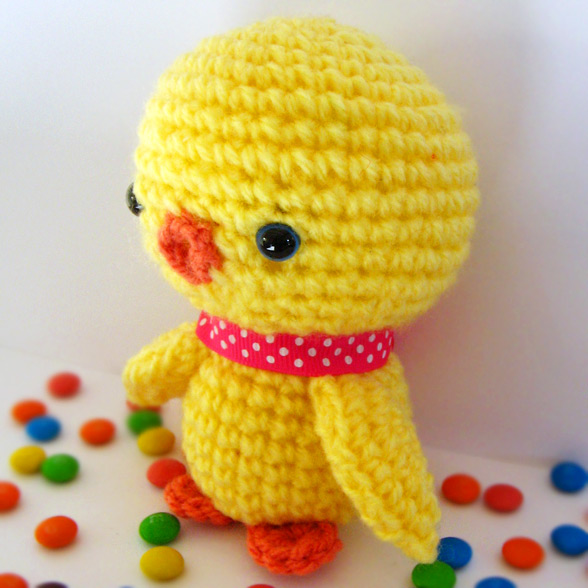
 Finishing: Install plastic eyes, sew mouth to the head.
Sew head to body, then wings and legs.
Glue the ribbon to the neck.
~ ~ ~ Thank You ~ ~ ~


0 comments:
Post a Comment