Materials:
Make: 1
Material indicated for small elephant is in bracket [ ]
1. Fabric (stripes), 8″ x 18″ [4" x 9"]
2. Fabric (orange), 6″ x 10″ [3" x 5"].
3. Ribbon, 4″ [4"]
4. Embroidery Floss (grey)
5. Poly-fill stuffing material
6. Silica gel beads or plastic beads (optional)
7. Letter size paper, 3
Tools:
1. Sewing machine
2. Sewing needle and pins
3. Scissors
4. Erasable fabric marker
5. Printer
Seam Allowance: 1/4″
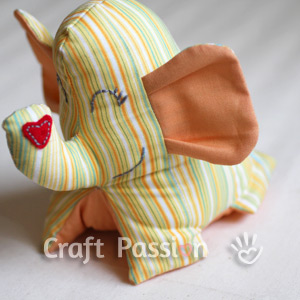
Finished Dimension: 6 1/2″ (W) x 6″ (H) x 4 1/2″ (D) [3 1/4" (W) x 3" (H) x 2 1/4" (D)]

 Sew ears with wrong side facing each other; a piece of stripe fabric matches with a piece of plain orange fabric.
Optional: trim 1/4″ seam allowance from the sewing line to neaten the raw edges.
You can either cut the seam allowance with pinking shear, or, with scissor then clip curve accordingly to provide smooth curvature.
Turn right-side out and smooth out the seam.
Fold the 2 sides of the ears inward to match the width of the ear markings on the body. Pin or make a few stitches to secure the fold.
 Sandwich the ear with the 2-part body pattern. Align the ear within the ear markings on the body. Sew.
Press seam to side and make the ear pointing to the tail side of the elephant.
 Align the paper pattern on the right side of the elephant, trace the facial feature on it with erasable fabric marker.
Embroidery the lines with back stitches or branch stitches.
An easy way to do the tracing is by slitting the lines on the paper pattern with sharp object, craft knife or pen tip, to create “holes” for the fabric pen to go through and mark on the fabric according to the line.
 Embellish the nose with a heart shaped felt if you wish.
 Fold the ribbon into halve and sew to the tail marking.
 Repeat the other side except attaching the ribbon to the tail.
Place both layers with right side facing each other, align, pin and sew from A to B marking.
Remember to leave an opening for turning right side out in the later stage.
 Align base piece to the limbs of the elephant, sew around.
Trim seam allowance to 1/4″ wide with pinking shear or scissors. Clip curve and pay particular attention to the concave curves.
 Turn the elephant right side out from the opening and smooth out the seam and curve.
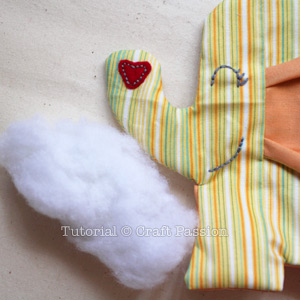
 Stuff the elephant with poly-fill. Begin with the trunk/nose then the whole body.
 Stuff firmly. You may add silica gel beads or plastic beads to the bottom of the elephant to weight it down.
 Close the opening with ladder or slip stitch.
 Give the elephant a gentle massage to even out the filling and shape it accordingly.
 Sew a few more to build a happy family.
Done!

Trace pattern on the wrong side of the fabrics with pencil or erasable fabric marker.
Cut them out with 1/4″ seam allowance or larger.
Make: 1
Material indicated for small elephant is in bracket [ ]
1. Fabric (stripes), 8″ x 18″ [4" x 9"]
2. Fabric (orange), 6″ x 10″ [3" x 5"].
3. Ribbon, 4″ [4"]
4. Embroidery Floss (grey)
5. Poly-fill stuffing material
6. Silica gel beads or plastic beads (optional)
7. Letter size paper, 3
Tools:
1. Sewing machine
2. Sewing needle and pins
3. Scissors
4. Erasable fabric marker
5. Printer
Seam Allowance: 1/4″
Finished Dimension: 6 1/2″ (W) x 6″ (H) x 4 1/2″ (D) [3 1/4" (W) x 3" (H) x 2 1/4" (D)]

 Sew ears with wrong side facing each other; a piece of stripe fabric matches with a piece of plain orange fabric.
Optional: trim 1/4″ seam allowance from the sewing line to neaten the raw edges.
You can either cut the seam allowance with pinking shear, or, with scissor then clip curve accordingly to provide smooth curvature.
Turn right-side out and smooth out the seam.
Fold the 2 sides of the ears inward to match the width of the ear markings on the body. Pin or make a few stitches to secure the fold.
 Sandwich the ear with the 2-part body pattern. Align the ear within the ear markings on the body. Sew.
Press seam to side and make the ear pointing to the tail side of the elephant.
 Align the paper pattern on the right side of the elephant, trace the facial feature on it with erasable fabric marker.
Embroidery the lines with back stitches or branch stitches.
An easy way to do the tracing is by slitting the lines on the paper pattern with sharp object, craft knife or pen tip, to create “holes” for the fabric pen to go through and mark on the fabric according to the line.
 Embellish the nose with a heart shaped felt if you wish.
 Fold the ribbon into halve and sew to the tail marking.
 Repeat the other side except attaching the ribbon to the tail.
Place both layers with right side facing each other, align, pin and sew from A to B marking.
Remember to leave an opening for turning right side out in the later stage.
 Align base piece to the limbs of the elephant, sew around.
Trim seam allowance to 1/4″ wide with pinking shear or scissors. Clip curve and pay particular attention to the concave curves.
 Turn the elephant right side out from the opening and smooth out the seam and curve.
 Stuff the elephant with poly-fill. Begin with the trunk/nose then the whole body.
 Stuff firmly. You may add silica gel beads or plastic beads to the bottom of the elephant to weight it down.
 Close the opening with ladder or slip stitch.
 Give the elephant a gentle massage to even out the filling and shape it accordingly.
 Sew a few more to build a happy family.
Done!

Trace pattern on the wrong side of the fabrics with pencil or erasable fabric marker.
Cut them out with 1/4″ seam allowance or larger.


0 comments:
Post a Comment